The other day i was complaining to my dh taht we needed abigger house because i never iron because i have nowhere to set up and leave up my ironing board and iron. wahwahwah
i later proceeded to complain a few day slater taht i never used my sewing maching becuase i had nowhere to set it up and leave it out. when i sew, i have to set it up on the dining room table andmy sewing isnt very quick yet so i have a mess out in the dining room which is attached to the living room andis the first room yousee when you walk in the front door so makes the whole house look messy til i get all the junk put away and then my wips stay wips forever because idont wantto get all the mess out again etc....
woe is me ;P
so dh said, "you always foldlaundry on our bed, and a lot of your crafty stuff is stored in teh bedroom, and if we organized the room differentl, we could carve out a space for your machine and the ironing board."
Christophe is a very action oriented person. He never says he will do something...he does it. RIGHT THEN! So, within 10 minutes, we had moved furniture all aroun and created a nice little space for me. We got the ironing board (which just happens to match our walls - how convenient ;D ) and iron set up. And we looked on internet for a sewing table, found one for about 50 euros, shipment included, and tried to order it but there was a problem with the site's mailbox...??? whatever :P
anyhow, DH promised me we would be on thelook-out for a table the following week on my days off.
I then worked sat sun and mon in ER - LONG HARD DAYS!!! and office day on tuesday. i was totally wiped out!!!!!
But when i came home monday night and drug myself into my bedroom....GASP!
Look what i saw!!!!
Untitled, a photo by rebeccawip on Flickr.
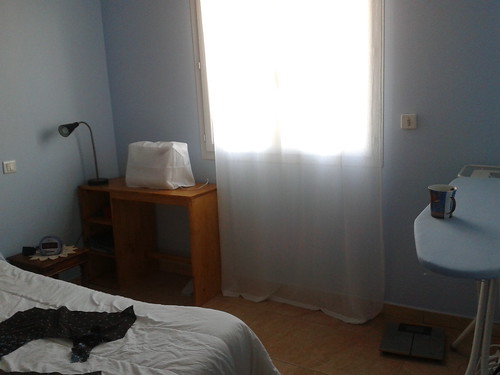
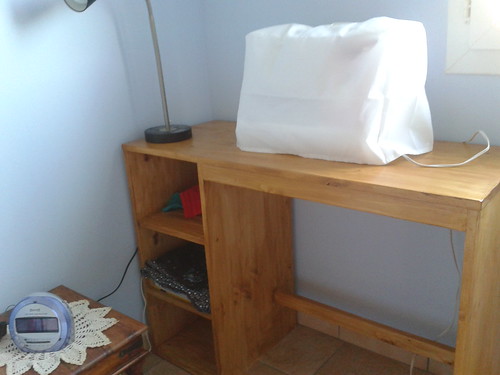
Of course this pic was taken on wednesday when i was finally off and able to get my corner organized and the machine set up on the table.
All i really saw at the time was an empty table, but...i mean, WOW!!!!!!!!!!
Can you believe how sweet this is!
My dh and my dd made this together out of plyboards :D
SO SWEET!
and perfect!
i already have some sewing i need to do for remi in the top cubby and my current wip in the second.
So, speaking of wips...here's my current wip.......
that i'm too intimidated to continue.......
It's a cute dress from my sew everything workshop book by diana rupp.
The thing is, i can never wear dresses because of my big boobs. i it fits in the bust, it hangs funny on my shoulders, is baggy at the waist, and has a poofy thing at the small of my back.
I found out that this means i need to make a full bust adjustment (fba)
So i did some research online and found a site that talked me through it.
that said, i still didnt do it well right off the bat.
First i used some left over amy butler fabric from a skirt i made.
I traced the pattern onto some sewing paper and cut into it to make the modifications for the FBA.
I dont have this first mock-up. but it was way too small. i thought, according to my measurements, that i could get by with a small and add several inches for the bust.
But i need the medium plus fba.
even using the medium, it looks like it will be too small.
i wonder what's going on here.... i mean, the book says the seam allowances are included! and it says the patterns are drafted to be very forgiving and have plenty of ease and i am in the bottom of the medium range measurements given so it should have worked out, right? but no, it seems way too small.
that's the main reason i'm too intimidated to continue.
the other reason is that there are soooo many steps in this one - over 25 to be exact 8^O, not counting the cutting of the pattern... and that would be X2 as you're supposed to make a linging. But i wont be doing that for this one, which i'm considering a wearable muslin.
the fabric i am using was on mega sale!!! so it was as cheap as the muslin fabric you typically use.
So getting back to my fba mock-ups.
First one, not pictured, was too small.
Second one, pictured top right, was mis-shapen (see how wide the neck opening is) but i figured out why : the picture tutorial was for a princess seamed pattern (three panels for the front). mine only has one front piece. i needed to make the enlarged bust darts on the sidesof my pattern piece but i made them towards the middle for some stupid reason. i had gotten it right on my first mock-up that was too small, using this tutorial but got everything bass-ackwards on this one.
Third one, top left, think i finally got it right, though again, probably too small. that said i'm back up to my heaviest weight and i feel like crap - GOT TO FIX THIS :/
so if i get down to my typical weight, or even better, a few pounds under that, then maybe it will fit.
and the fourth one is the final one; bottom, cut out from the correct part of the material (to have just a few flowers on straps, like the back)
if icould just get the impetus and courage to sew it all together now....
then i fi like it i can make a real one.
and then i can get on to my next project : the bombshell dress :D
i finally bought the online class and cant wait to get to this one!
i also really want to buy gertie's new book and new butterick patterns but wont let myself until ive made at least one real dress out of my muslin and have at least started the online class and made the muslin for it.
i later proceeded to complain a few day slater taht i never used my sewing maching becuase i had nowhere to set it up and leave it out. when i sew, i have to set it up on the dining room table andmy sewing isnt very quick yet so i have a mess out in the dining room which is attached to the living room andis the first room yousee when you walk in the front door so makes the whole house look messy til i get all the junk put away and then my wips stay wips forever because idont wantto get all the mess out again etc....
woe is me ;P
so dh said, "you always foldlaundry on our bed, and a lot of your crafty stuff is stored in teh bedroom, and if we organized the room differentl, we could carve out a space for your machine and the ironing board."
Christophe is a very action oriented person. He never says he will do something...he does it. RIGHT THEN! So, within 10 minutes, we had moved furniture all aroun and created a nice little space for me. We got the ironing board (which just happens to match our walls - how convenient ;D ) and iron set up. And we looked on internet for a sewing table, found one for about 50 euros, shipment included, and tried to order it but there was a problem with the site's mailbox...??? whatever :P
anyhow, DH promised me we would be on thelook-out for a table the following week on my days off.
I then worked sat sun and mon in ER - LONG HARD DAYS!!! and office day on tuesday. i was totally wiped out!!!!!
But when i came home monday night and drug myself into my bedroom....GASP!
Look what i saw!!!!
Untitled, a photo by rebeccawip on Flickr.
Of course this pic was taken on wednesday when i was finally off and able to get my corner organized and the machine set up on the table.
All i really saw at the time was an empty table, but...i mean, WOW!!!!!!!!!!
Can you believe how sweet this is!
My dh and my dd made this together out of plyboards :D
SO SWEET!
and perfect!
i already have some sewing i need to do for remi in the top cubby and my current wip in the second.
So, speaking of wips...here's my current wip.......
that i'm too intimidated to continue.......
It's a cute dress from my sew everything workshop book by diana rupp.
The thing is, i can never wear dresses because of my big boobs. i it fits in the bust, it hangs funny on my shoulders, is baggy at the waist, and has a poofy thing at the small of my back.
I found out that this means i need to make a full bust adjustment (fba)
So i did some research online and found a site that talked me through it.
that said, i still didnt do it well right off the bat.
First i used some left over amy butler fabric from a skirt i made.
I traced the pattern onto some sewing paper and cut into it to make the modifications for the FBA.
I dont have this first mock-up. but it was way too small. i thought, according to my measurements, that i could get by with a small and add several inches for the bust.
But i need the medium plus fba.
even using the medium, it looks like it will be too small.
i wonder what's going on here.... i mean, the book says the seam allowances are included! and it says the patterns are drafted to be very forgiving and have plenty of ease and i am in the bottom of the medium range measurements given so it should have worked out, right? but no, it seems way too small.
that's the main reason i'm too intimidated to continue.
the other reason is that there are soooo many steps in this one - over 25 to be exact 8^O, not counting the cutting of the pattern... and that would be X2 as you're supposed to make a linging. But i wont be doing that for this one, which i'm considering a wearable muslin.
the fabric i am using was on mega sale!!! so it was as cheap as the muslin fabric you typically use.
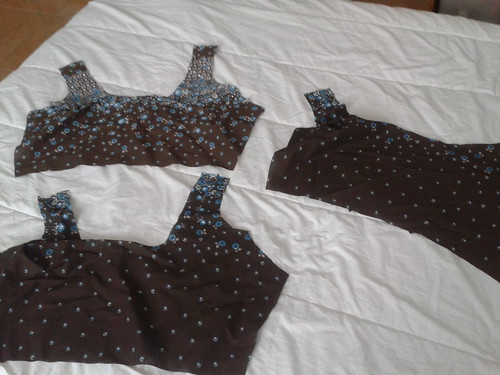
So getting back to my fba mock-ups.
First one, not pictured, was too small.
Second one, pictured top right, was mis-shapen (see how wide the neck opening is) but i figured out why : the picture tutorial was for a princess seamed pattern (three panels for the front). mine only has one front piece. i needed to make the enlarged bust darts on the sidesof my pattern piece but i made them towards the middle for some stupid reason. i had gotten it right on my first mock-up that was too small, using this tutorial but got everything bass-ackwards on this one.
Third one, top left, think i finally got it right, though again, probably too small. that said i'm back up to my heaviest weight and i feel like crap - GOT TO FIX THIS :/
so if i get down to my typical weight, or even better, a few pounds under that, then maybe it will fit.
and the fourth one is the final one; bottom, cut out from the correct part of the material (to have just a few flowers on straps, like the back)
if icould just get the impetus and courage to sew it all together now....
then i fi like it i can make a real one.
and then i can get on to my next project : the bombshell dress :D
i finally bought the online class and cant wait to get to this one!
i also really want to buy gertie's new book and new butterick patterns but wont let myself until ive made at least one real dress out of my muslin and have at least started the online class and made the muslin for it.
No comments:
Post a Comment